your Chromebook, so be sure to either wear an anti-static wrist strap or work on a surface ... doesn't generate static electricity, like wood, tile, or other hard floors.
INTRODUCCIÓN If your Chromebook is not getting any power, then this guide is going to help you get your power back. When working on replacing your battery, be sure to ground yourself. Static can short circuit your Chromebook, so be sure to either wear an anti-static wrist strap or work on a surface that doesn't generate static electricity, like wood, tile, or other hard floors.
HERRAMIENTAS: Metal Spudger (1) iFixit Opening Tools (1) 64 Bit Driver Kit (1)
Use the J0 screwdriver to remove the eight 5mm black screws on the bottom of the laptop, which includes the two that were hidden under the rear rubber feet.
Página 4 de 9
Asus Chromebook C201 Battery Replacement
ID de guía: 60766 - Borrador: 2016-05-09
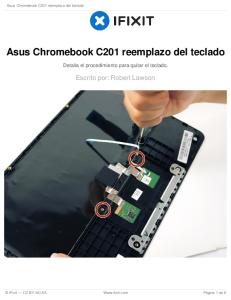
Paso 4
Turn the laptop on its side. Use a small, blue opening tool to pry the keyboard cover and laptop apart. Begin from the top right, next to the power button, and slowly work your way around to the opposite side until the keyboard cover is detached.
Paso 5
Gently flip the keyboard cover away from the laptop. Rest it safely upside down so the cables are not strained and are easily accessible.
Grab the the battery and remove it from the Chromebook.
To reassemble your device, follow these instructions in reverse order. La versión más reciente de este documento fue generada en 2019-09-02 07:01:28 PM .
Si el teclado de su Chromebook no está funcionando correctamente, entonces esta guía va a ayudarle a obtener sus claves de trabajo de la forma en que se ...
Gently lower the keyboard towards you to expose the wires attached beneath. ... Lift the black flap in the left black rectangle and pull the blue ribbon gently ...
Continue to snap together the sides of the chromebook in a rotating fashion starting with the red arrows and moving along to the green, yellow, then orange ...
This video is for Touch screen replacement, but at the beginning you can see how to open the back ... If you have a memory card inside - remove it first.
Step-by-step navigation to dissemble the phone until battery is accessible, Followed by instructions on how to remove the battery. Escrito por: Zoie E. Motorola ...
To reassemble your device, follow these instructions in reverse order. Este documento foi gerado pela última vez em 2017-09-06 02:27:16 AM. Passo 1 — ...
Gently open the back case by prying along the edge of the cover, starting at a corner of the phone and circling around the phone using a plastic opening tool.
Tightly pinch the top of the front and back halves of the housing.. Carefully pry the two halves of the housing apart.. BlackBerry 7100g Battery Terminal ...
Carefully insert a Spudger into one of the corners of the tablet.. Slide the Spudger along the edge popping the tabs out along the way.. Be careful not to break the tabs.. Paso 2 — Remove the battery. Slide the Spudger under the battery to lift it of
29 sept. 2016 - Escrito por: Dakoda Sanders. INTRODUCCIÓN. If your SoundLink III exhibits significantly decreased battery life or no longer takes a charge, ...
27 oct. 2017 - This guide will show the reader how to remove the battery of their Jazz HDV178 in the case that they will replace the battery or continue on to ...
La versión más reciente de este documento fue generada en 2018-01-06 07:03:25 AM . Paso 1 — Battery. Place your thumb on the right side of the camera over ...
Do this beside the volume button and the micro SD cover. ... The best method to complete this is to pull the bundled cable connector out with your hands. Pull.
Place thumb on top of the triangle and press into the phone while sliding your thumb ... La versión más reciente de este documento fue generada en 2017-09-12 ...
21 oct. 2016 - Audiovox CDM-8910 Battery Replacement. This guide will inform the reader how to access and replace/install the battery for the Audiovox.
Push the release tabs toward the center of the device.. Remove the battery.. Paso 2 — Insert Replacement Battery. Take the replacement battery and insert it ...
Paso 3. Carefully separate the back piece from the device using a plastic opening tool.. Remember to open along the entire perimeter of the tablet.. Paso 4.
Turn the computer over to see the small tab on the battery located near ... Once the tab is in the unlocked position (far right), pull the battery outwards away from ...
Before you begin, make sure your device is powered off and not connected to the power supply.. Turn the tablet over and position it so it matches the picture.