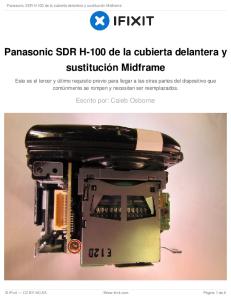
Panasonic SDR H-100 HDD Replacement The HDD is where the memory is stored for the camcorder. Without this the videos and pictures that are taken cannot be saved.
Pry under the HDD gently with a plastic opening tool, and the HDD should easily come out of the casing.
The HDD is now out (The HDD is ready to be replaced).
Paso 10
To reassemble your device, follow these instructions in reverse order. La versión más reciente de este documento fue generada en 2019-02-21 09:47:18 AM .
latch that holds the thin ribbon in place.. It should fall out on its own or with a gentle tug.. Panasonic Lumix DMC-FX01 LCD Screen Replacement. Borrador: ...
Diseñado para temperaturas ultra bajas de -152 ºC, con un nivel bajo de ruido. • Temperatura controlada por microprocesador con display LED. • Refrigerante ...
Replacement. This guide gives instructions for installing an SD card in the Panasonic D-snap SV-AV50. Escrito por: Zoe Hinck. Panasonic D-snap SV-AV50 SD ...
Press. >`Colon stops flashing; time of day is entered. NOTES: 1.To reset the clock, repeat steps 1-3. 2.The clock will retain the time of day as long as the oven is p_ugged in and electricity is sup- plied. 3.Clock is a 12 hour display. 4.Oven will n
(1) the marked electrical rating of the cord set or extension cord should be at ... Do not tilt the rice-cooker on its edge or place it upside down with its power ...
to St. So St. So St. So So St St St St. So White: stand-by Wit: standby Blue:Wi-Fiready Blu:Wi-Fiativo Blauw: Wi-Fi ready ony6oi:OTOBK. 23S-92 .... S. | Connect your Wi-Fi HDD to your mobile devices (no Internet connection required) Connectervotre Wi
posibilidad de contaminaciones cruzadas. • Compresor en cascada. Diseñado para temperaturas ultra bajas de -152 ºC, con un nivel bajo de ruido. • Temperatura controlada por microprocesador con display LED. • Refrigerante libre de HCFCs. • Separador d
Paso 3. Desatornillar 4x M 2.5x5.0 tornillos y desconectar los cables de la flexión: 3x.. Encienda el cable de la flexión.. Alfombrilla de ratón de cable flexible.
Herramientas de montaje. M9994599. 02/2017-017. 0 mm. 10. 20. 30. 40. 50. 60. 70. 80 ... Meliconi S.p.A. - V. Minghetti, 10 ... Keep out of the reach of children. .... Produkt ten zawiera niewielkie elementy, które w przypadku połknięcia mogą ...
5 Pivot action selector. 6 Lock ring ... You can change the pivot action whether the shaver is turned on ... Apply some hand soap and some water to the outer foil.
detergent in the detergent cartridge dilutes and the water inside the tank will .... outer foil mark ( ) and securely attach ... attached to the inside of the cleaning tray.
Keep the unit as far away as possible from electromagnetic equipment (such as microwave ovens, TVs, video games, radio transmitters, high-voltage lines etc.). ≥ Do not use the camera near cell phones because doing so may result in noise adversely aff
enhancements. ≥ Four ThirdsTM is a trademark. ≥ Micro Four Thirds is a trademark. ≥ Other names, company names, and product names printed in these instructions are trademarks or registered trademarks of the companies concerned. ENGLISH. VQT2A12_ENG_S
Do not use benzine, thinner, alcohol or other similar cleaning agents to clean the lens glass or exterior cabinet. • Using solvents can damage the lens or cause the paint to peel. • Wipe off any dust or fingerprints with a soft, dry cloth. • Use a dr
of charge, in the USA or Puerto Rico from the date of surge, improper voltage supply, lightning damage, or original purchase in the event of a defect in materials.
1 ago. 2018 - 1972; and Section 504 of the Rehabilitation Act of 1973, as amended. 3. It is policy of Balmorhea ISD not to discriminate on the basis of race, ...
La cubierta posterior, de nuevo diseño, junto con la disposición eficiente del sistema de refrigeración ofrecen un mejor flujo de aire, haciendo posible una ...